Rent-Friendly Kitchen Glow-Up, Instantly

Today we dive into kitchen refreshes for renters with peel-and-stick backsplashes and counter wraps, delivering fast style without jeopardizing deposits. Expect practical measuring tips, honest material comparisons, installation checklists, and design strategies that brighten small spaces. Learn from real renter stories, avoid costly mistakes, and discover simple, reversible upgrades that look custom, clean easily, and remove gracefully when it is time to move. Join the conversation and share your own before-and-after inspirations.

Plan First: Measure, Budget, and Align With Your Lease

Take Smart Measurements

Measure twice in the morning and once at night, because shadows and fatigue can fool your eyes in tiny kitchens. Record widths, heights, and linear runs for every backsplash segment and counter edge. Add at least ten percent extra material for trimming, pattern matching, and insurance against slipups. Mark appliances and sink cutouts precisely. A paper template for tricky corners and outlets prevents waste, accelerates sticking, and keeps seams almost invisible.

Set a Realistic Budget

List costs for tiles, films, squeegees, utility blades, cleaning supplies, and optional heat guns. Compare square-foot prices across brands, then factor in shipping and returns. Plan a contingency for sample packs, because touching textures and finishes under your real lighting saves money later. Include renter-safe cleaners, painter’s tape, and microfiber cloths. Track everything on a simple spreadsheet so you can pivot materials confidently if sales appear or stock runs low unexpectedly.

Talk to Your Landlord the Right Way

Request permission with clear, reassuring details: removable products, gentle adhesives, and full responsibility for clean removal. Attach product links, certifications, and a short plan describing surface prep and non-damaging techniques. Offer a sample on a discreet area to demonstrate reversibility. Promise photos after installation and before move-out. Many landlords appreciate improvements that protect walls and counters, especially if grease cleanup gets easier. Respectful communication builds trust, keeps expectations aligned, and safeguards your deposit.

Materials That Fool the Eye and Survive Daily Use

Modern peel-and-stick technology offers vinyl, gel, and composite backsplash tiles, alongside counter wraps that mimic marble, concrete, terrazzo, or butcher block. Look for thicker wear layers, heat and moisture resistance, and stain guards. Matte finishes hide fingerprints; high-gloss bounces precious light in small apartments. UV stability matters near windows. Request samples, bend them around corners, splash sauce, and scrub with gentle cleaners. Choose looks that harmonize with cabinets, appliances, and the natural light you actually live with.

Backsplash Tiles: Vinyl, Gel, and Composite Options

Vinyl tiles handle steam well and cut cleanly; gel tiles add dimensional pop that mimics real grout lines under evening lighting. Composites feel sturdier around sinks and heavy cookware. Compare adhesives by testing on primed scrap board, then on a painted area. Focus on ease of repositioning, edge curl resistance, and stain behavior. Remember, light textures hide splashes better, while darker patterns conceal seams. Choose a balance that flatters your space and cooking habits.

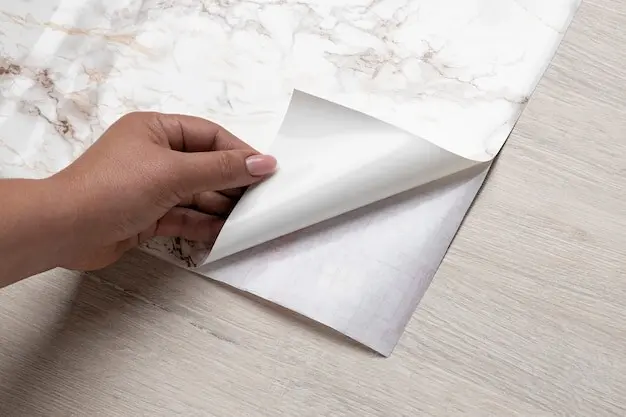
Counter Wrap Films: Matte Stone, High-Gloss, and Butcher Block Looks

Counter films vary widely in thickness, stretch, and scratch resistance. Matte stone reads sophisticated under warm bulbs, while high-gloss adds sparkle beside stainless appliances. Butcher block prints can soften stark cabinetry beautifully. Test films around sink lips and rounded edges to gauge conformability. Search for heat tolerance near coffee makers, and use trivets for pans. A higher-grade film often pays back through easier squeegeeing, crisper seams, and fewer lifted corners during daily wiping and meal prep.

Safety and Certifications to Consider

Look for low-VOC claims, third-party testing, and manufacturer heat recommendations in writing. Around stoves, many renters add a slim metal shield or leave a safe perimeter to respect clearance. Confirm fire codes for your building and keep adhesives away from direct flames. If sensitive to odors, unbox materials early and ventilate. Store rolls flat to prevent memory curl. Responsible selection keeps indoor air kinder, maintenance simple, and your new surfaces pleasant from installation to move-out day.

Surface Prep and Installation You Can Do Before Dinner

Preparation decides everything. Degrease thoroughly, degloss if needed, and let surfaces dry completely. A dust-free base prevents bubbles, while careful layout lines guide perfect alignment. Work from a well-lit corner, use a felt squeegee, and swap dull blades fast. Take breathers to check symmetry across outlets and cabinets. With patience, seams melt away, textures sit flat, and patterns track straight. You finish earlier, make fewer corrections, and admire results that look designed, not improvised.

Prep Like a Pro

Scrub walls and counters using a renter-safe degreaser, rinse with clean water, then allow extended drying time. Wipe with isopropyl alcohol on glossy paint to remove hidden residue. If surfaces feel powdery, apply a compatible primer designed for peel-and-stick products. Fill nail holes and sand lightly. Vacuum dust from baseboards and caulk lines. Good prep transforms questionable corners into reliable adhesion zones, minimizing lifts, evening textures, and delivering that satisfying, crisp edge along every cabinet run.

Sticking the First Course Straight

Snap a level reference line and dry-fit the first row to confirm outlet spacing. Peel back only a few inches of liner to start, then squeegee outward slowly. Watch for stretch on long runs and pause to rest your wrists. Check alignment after each tile or twelve inches of film. Small course corrections early save painful rework later. Celebrate the first straight row; everything above and below will follow its confidence, creating a look that feels professionally installed.

Seams, Corners, and Cutouts Without Fear

Overlap slightly, then double-cut with a fresh blade for nearly invisible seams. Warm stubborn corners gently with a hair dryer, rolling edges tight with a silicone roller. For outlets, remove plates, trace carefully, and leave tiny relief cuts inside corners to prevent tears. Around sinks, dry everything meticulously and seal vulnerable edges if the manufacturer allows. Patience beats force every time. Clean edges, smooth turns, and accurate cutouts turn a rental kitchen into a polished daily pleasure.

Design Moves for Small Rentals With Big Ambition

Style thrives within constraints. Light backsplash tones expand cramped galley kitchens, while a subtle veining on counters introduces movement without chaos. Consider vertical stack patterns for modern clarity, or classic subway rhythms for visual calm. Balance texture with simple cabinet hardware and warm bulbs. Add a slim rail for utensils to save counter space. Borrow color from a favorite mug set. Thoughtful continuity across surfaces creates delight, photography-friendly moments, and a morning routine that feels intentionally elevated.

Color Stories That Enlarge and Brighten

Choose off-white, pale gray, or soft sand for backsplashes to lift shadows under upper cabinets. Carry a gentle marble wrap onto counters so light flows effortlessly from sink to stove. If you crave contrast, limit it to one focused zone like a coffee corner. Metallic peel-and-stick accents can echo appliance finishes subtly. Test samples at night and early morning; color shifts with bulbs and window angles. Consistency across surfaces calms clutter and amplifies perceived square footage nicely.

Patterns That Hide Splashes and Boost Texture

Micro-patterns disguise sauce flecks and water spots, gifting you longer stretches between deep cleans. Try a linen-like counter wrap paired with barely speckled backsplash tiles for soft dimension. Geometric repeats can guide the eye horizontally, making narrow rooms seem wider. If you love bold prints, reserve them behind small appliances. Keep grout-line illusions thin for a crisp, modern read. When pattern scale and repetition synchronize with cabinet proportions, the overall composition feels balanced, polished, and pleasantly lived-in.

Hardware, Lighting, and Micro-Updates That Complement Films

Swap in adhesive puck lights or a plug-in LED bar to bounce brightness off reflective tiles. Add removable brass pulls to echo warm veining in faux marble wraps. A thin runner introduces color continuity underfoot. Magnetic spice tins clear counters while spotlighting backsplash texture. Consider a compact dish rack that frames your favorite corner for photos. Each tiny upgrade respects your lease while reinforcing the materials’ story, letting your space feel cohesive, curated, and charming every single day.

Living With It: Cleaning, Heat, and Moisture Management

Daily and Weekly Care Routines

Adopt a quick nightly wipe using mild dish soap and warm water, then dry thoroughly at seams. Once weekly, spot-treat stains with manufacturer-approved cleaners. Reserve melamine sponges for emergency marks and test inconspicuously first. Avoid oil-based polishes that can soften adhesives. Check splash zones near the stove and sink, smoothing any tiny bubbles before they grow. A two-minute ritual reinforces adhesion, protects edges, and keeps surfaces bright, so hosting friends feels easy and genuinely welcoming.

Heat Zones and Steam Strategy

Peel-and-stick surfaces dislike prolonged direct heat. Use a backplate or leave a safe gap behind burners as guidance suggests. Park air fryers and toaster ovens slightly forward so vents miss vertical edges. When boiling pasta, angle lids to direct steam away from corners. Turn on the fan early; ventilation matters more than heroics later. These gentle adjustments respect adhesives, reduce warping, and help your backsplash age gracefully while your counters keep their crisp, convincing finish through busy weeks.

Fixing Bubbles, Lifts, and Scratches

Tiny bubbles surrender to a pinprick and a sweep of a felt squeegee. For lifted corners, warm gently and press with a roller until cool. Minor scratches often buff down with a soft pad recommended by the brand. If damage persists, patch with a carefully aligned offcut; pattern matching beats guesswork. Keep a labeled envelope of scraps for emergencies. Quick repairs protect the illusion, extend lifespan, and give you confidence that small hiccups never derail your beautiful rental refresh.

Move-Out Magic: Clean Removal and Deposit Protection

Test, Warm, and Peel Without Drama

Start with a hidden corner and assess resistance. Use a hair dryer to slightly soften adhesive, then peel back at a low angle while guiding with your other hand. Pause if paint lifts; add more warmth and patience. Collect liners immediately so dust stays away. Work in daylight, keeping pets distant. Gentle technique prevents tearing, preserves original finishes, and showcases that temporary can be truly temporary—no surprises, no flaking chips, just a tidy reveal of what was beneath.

Patch, Polish, and Photograph Your Success

After removal, wipe surfaces twice, then inspect edges where grease once lingered. Touch up tiny scuffs with matching paint if allowed, and polish stainless to reflect your care. Photograph wide and close-up shots, including outlets and corners. These images become proof of diligence if questions arise. Share them with your landlord alongside a kind message. Thoughtful documentation smooths move-out nerves, honors your effort, and might even inspire permission for upgrades in your next place sooner than expected.

Donate, Reuse, or Recycle Thoughtfully

Leftover tiles and film offcuts help neighbors repair a scuffed strip or refresh a drawer liner. Offer clean scraps to local makers for craft projects, or store neatly for future rentals. Cardboard cores and packaging often recycle curbside; check local rules. Responsible disposal protects your budget and neighborhood. Sharing knowledge and materials invites new friendships, encourages sustainable habits, and extends the story of your project well beyond move-out day, turning a simple refresh into a generous ripple.
Siralaxinilolento
Privacy Overview

This website uses cookies so that we can provide you with the best user experience possible. Cookie information is stored in your browser and performs functions such as recognising you when you return to our website and helping our team to understand which sections of the website you find most interesting and useful.